how to make a family yearbook

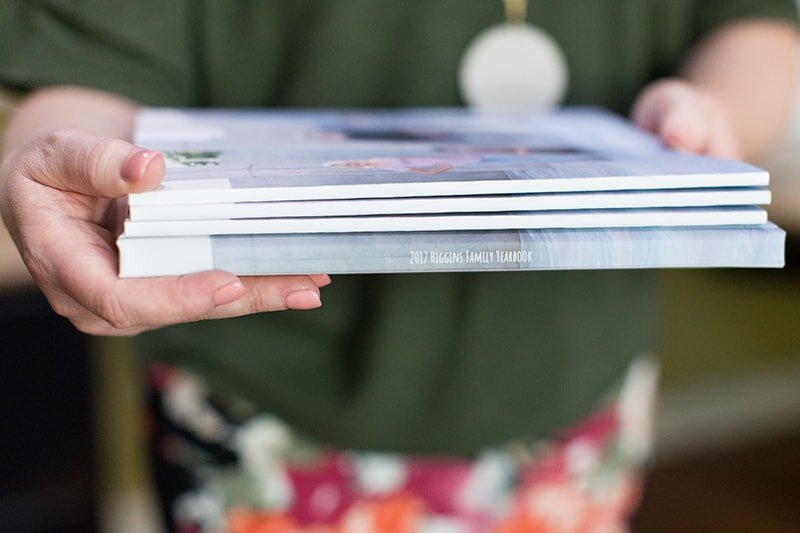
In this picture I'm holding one of my most valuable treasures -- a 10" x 10" hard cover copy of our 2017 Higgins Family Yearbook. A book FULL of our memories! Get comfortable because I'm going to walk you through exactly how to make a family yearbook yourself! It's so so easy ... and so so rewarding. And as your biggest cheerleader in the memory-keeping goals you have for yourself, I'm going out on a limb and telling you right now that this is one of the most significant blog posts I've ever written and one that I hope is referred to often.
Actually ... really what I mean instead of "how to" is ... How I make a family yearbook. I'm sharing what works for me. You shouldn't feel like you have to make a photo book (or any memory-keeping project) in a certain way, but you and I both know how helpful it is when people share what THEY do and what works for THEM ... and that's exactly what I'm doing in this blog post! I'm SO excited to be sharing this because it's something that has worked for me for several years now (since the Project Life® App was launched) and so it's not only tried + true, but it still makes me so. dang. happy (!!) and I want to shout it from the rooftops!
Why so much joy?
1) Because I'm on top of my family memory keeping. That feels straight-up amazing.
2) Because I know that my children feel a stronger sense of who they are and how valued they are as a part of our family with these recorded memories and visual reminders of our life together.
3) Because I deeply feel that our posterity will somehow benefit from seeing this life we live, the choices we make, the faith we have, the people we love, the current events of our lifetime, and the personal experiences we have.
4) Because I essentially do the whole thing entirely on my phone and in the most comfortable position ... like in my bed, you guys! I don't have to go through the extra steps of printing pictures first or getting out supplies or making and cleaning up messes of any kind! I don't even have to clear a space on my table for this. I mean ... is this really even scrapbooking?? (YES! Isn't that awesome!?)
Begin with the end in mind.
The reason I'm always quoting Stephen Covey is because this principle really works -- in all aspects of life, and even with memory keeping! For real! So this is the "end" goal I envision and how it affects how I choose to do memory keeping for my family: One day each of our children will leave the nest. I want each of them to have a set of THIN photo books -- our family yearbooks -- that represent their upbringing in our family. Here's a set of one child's family yearbooks so far.

The math may not add up for you. You may be wondering, "But Becky, your kids are 15, 12, and 9. I only see 6 year's worth there." And you would be correct. I've been really diligent about intentional family yearbooks since 2008, when our youngest was born. But I have some gaps. We started this company and launched the physical Project Life® system in 2009. The Project Life App came later, in 2014.
In between there, we were partnered with a company that implemented our page template designs for a "digital" version of Project Life that resulted in bound photo books. That company doesn't exist anymore. We were also partnered with Shutterfly for Project Life photo books, but we phased that out around the time the app was launching. So those books you see to the left? They're 8.5" x 11" and not a result of the app -- because the app didn't exist yet. Obviously I love them just as much as any other scrapbook or photo book! Just explaining why they look different. The two photo books to the right (10" x 10") are our soft cover family yearbooks from the past couple years, printed through the app, now that we offer photo books through the app.
NOTE: Our hard cover photo books allow for text on the spine but unfortunately it's not possible on the soft cover, specifically because we allow for a huge range in how thin or thick the book can be and that variable prohibits the printing machines from doing an accurate job on the spacing. We are fans of accuracy, so there's no text on the spine of soft cover photo books.
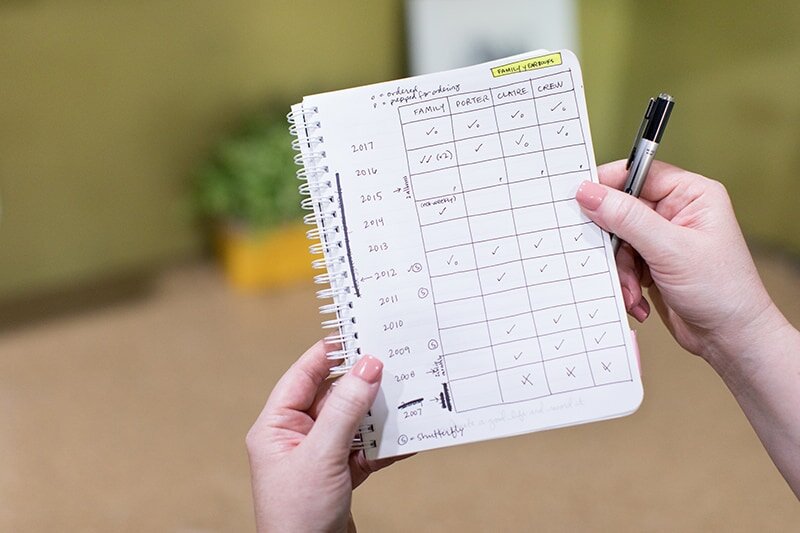
ANYway ... I'm a little side-tracked now but these anecdotes and insights are often helpful so I'm not holding back, k? I'm sharing what MY memory-keeping situation is, knowing that you will glean whatever you want to glean from my sharing. Right now I'm interested in figuring out where I have gaps, for one reason or another. Some books were created, but I didn't yet print the 4 copies (one for us to keep + one for each of the kids). I've got a couple years that are just completely "missing" and I need to track down what's up. Perhaps they were years I did the physical version, so now I'll want to scan those pages, pull them into the app, and print photo book versions for the kids. Who knows! But that's not the point of this blog post. That's my own personal "where I am" with Project Photo Rescue at the Higgins house. And here's my little chart I whipped up to assess where I am and which gaps I have to fill (which of course sits in my trusty Simple Notebook).
Can we go back to the big-picture vision I have? Okay, good. ; )
So ... I want my kids to have a series of family yearbooks to keep for themselves, always. Great. But what about their STUFF? You know ... the stuff that's more personal to each of them! Certificates and awards, programs, school portraits, report cards, papers, special birthday cards and ... you get the gist. Well ... that stuff goes in their ALBUMS! Beginning with the end in mind, I've envisioned for MANY years now, that I want each child to have about "this many" albums. For me, it feels like the right amount. Not too much but certainly a healthy amount of stuff to keep!
All albums shown here are the Project Life 12x12 Cloth Albums found in our online shop. We also have faux leather and printed designs and an array of sizes to meet many scrapbooking needs.
Turns out 6 albums is a really good number that fills these cubes in our home beautifully ... but if another one has to be added later, that's fine. It's not about the cubes. It's not about the number "6" being magical. It's about the general idea ... the long-term vision. Ultimately these scrapbooks (one color per child, as seen here) are theirs to keep forever. These memory-rich albums have evolved over the years to include less photographs (because I really do cover my bases of the whole family in our family yearbooks) ... and more memorabilia and such. You can read all about that over in this blog post.
So ... that's my goal! That's my big-picture vision! This is how I begin with the end in mind. Each child will take with them a set of family yearbooks + a set of 12x12 albums! They'll take however many they want and when they want, which I'm sure will depend on the available space they have in different stages of life.
But isn't it too late to start?
This whole topic of creating a family yearbook tends to work well in a yearly, calendar-based format -- January to December. I always say "DO WHAT WORKS FOR YOU" and this annual project I'm sharing with you right now? It totally works for me. So I do it! If you want to adjust that in some way and do a family yearbook entirely differently ... by all means, do what works for you. That said, if you really do want to start in January but you're feeling like you're "too late" to start (we're well into January at the time this is published) ... that's simply not true. It's NOT too late!
Here's how you can pick up NOW and not only be "just fine" but totally have yourself set up for real memory-keeping success all year long! Keep reading the blog post. Feel inspired. Figure out the best method for you. Then just back track a few weeks. If you do just one page (or even two pages) per week, we're talking like less than an hour's worth of your time to get those pages caught up and then it's just a matter of "maintaining" and staying up on this week after week, and only minutes at a time. It's so do-able, my friend. So totally something you can absolutely do -- and you won't regret it. Start now! Back track if you want -- OR -- start right where you are and don't even go back! We all know that's just for the OCD tendencies that some of us have. ; )
How I do it.
Like ... start to finish. From setting this up in the first place, to chipping away throughout the year, to printing the completed book at the end of the year ... I'm going to share exactly how I do it! First, here's the quick, high-level "cheat sheet" view of the main points (for quick-reference), then I'll dive into some details where I'll include some helpful tips and other anecdotes worths mentioning.
1) At the END of each week, I open a fresh, new page template in the Project Life App, add a weekly title card (from a "Project 52" collection), a journaling card, and 6 photos that represent our family's week. This takes me 10-15 minutes.
2) Upon completion of the page, I export to two places -- Dropbox and iCloud -- and I also name the page and save it to a specific "Family Yearbook" project folder within the app. This takes about 2 minutes to do all of this.
3) Repeat week after week after week after week -- 52 weeks of the year. Just 10-15 minutes per week.
4) At the end of the year, I order a photo book through the app. It takes about 15 minutes to add each page (in my intended order) to the "project" and do a quick review, and tap on "place order"! Great feeling. I order a hard cover for us to keep at home + a soft cover (less expensive) photo book for each of our 3 kids.
Okay ... diving into the details
weekly rhythm
STEP ONE -- MAKE A PAGE EACH WEEK | I mentioned that I do this at the END of each week. For the purpose of these family yearbooks, I choose a Monday through Sunday format because that takes us through the weekend, so weekend stuff stays together on a page, know what I mean? Personal preference and something that I actually changed from my original Sunday through Saturday format years ago. It doesn't really matter, but that's what I do.
When I make my weekly page I get myself cozy. Not because it's going to take a while; it's crazy fast. But because it feels like a TREAT to scrapbook on my phone so I might as well completely indulge and be snuggled up in my most favorite spot -- my bed! Sometimes it happens in a car or on a plane. But usually, I'm horizontal and happy. ; )
I open the app, tap on that turquoise section to initiate a new page, and get going. What's super cool is that one of our latest app updates included the ability to have some personal preferences already set up in default mode so that automatically, when I start a new page, my page will be Design A, it will have square corners (instead of rounded), and my favorite font, in my preferred default size (8.0), is already in place. It's pretty rad and quickens up my workflow by a few seconds, which is awesome.
To set up your personal preferences, go to the home screen of the app, tap on the green "?", select "Preferences", and it's all right there!
Like I said, this is where I whip up my weekly page. The first thing I do is pull in that week's specific title card. They're designed to be 4x6, but I like to tap + hold + drag + drop that into one of the smaller 3x4 spots so the larger spot can be for a photo.

The title card shown here is from the "Project 52 - Fresh" Edition which was our 2017 collection. We have a new collection for 2018 which will come out within days of this post going live. I plan to use the new 2018 cards (it's called "Project 52 - Rad" and it really is fantastic).
Then I pull one of the blank cards into a 3x4 spot. We have loads of designer cards in each collection, but I've chosen to simplify my overall design aesthetic and have all the focus be on the pictures. So I pull in a solid colored card. And I immediately type the dates. For example, "January 1-7". Then I tap on each "pocket" and pull in several photos from the week that I feel best represent my family's story from that week.
I don't overthink this. I just have all the most recent pictures sitting in my camera roll, and as my eyes scan over the pictures, I know I'm instantly drawn to certain pictures for certain reasons ... and I add them! That's it! Ends up being about 6 photos per week and that feels sufficient for me. Yes, sometimes it's hard to narrow down and choose ... but I just do it. And I move on with a smile on my face. And yes, that one little block for journaling seems like perhaps not enough room to say all the stuff. My choice is to keep things more brief so that I'll DO it, and be able to KEEP UP with it, and I feel like it's fantastic journaling. So again ... I'm doing what works for me. : )
NOTE: For weeks where I really do have so much more to say, the journaling card goes in a 4x6 spot and that's totally fine once in a while.
ANOTHER NOTE: In terms of getting all the journaling on one card, what works for me is putting the week's dates first, then I'll identify the pictures as I write about the memories. For example, "TOP LEFT. (Explain the picture / write about the memory.) TOP RIGHT. (Explain the picture / write about the memory.) LEFT + RIGHT. (Explain the pictures / write about the memories.) BOTTOM LEFT. (Explain the picture / write about the memory.) BOTTOM RIGHT. (Explain the picture / write about the memory.)" That way my journaling correlates with my pictures.
STEP TWO -- EXPORT + SAVE EACH PAGE | Every single page that is started in the app (even if you only put one thing in one spot on the page) is automatically saved to your Library in the app (that's the yellow section). Very cool. You'll see your "In Progress" pages, your "Completed Pages" and "My Folders" and more. I love that they're automatically saved in the app, and I TRUST our app (of course!), but we always say "Technology is technology, no matter what. And you can't always depend on technology." You can't guarantee that your phone won't completely crash or get thrown in the pool by your little one, or that you won't accidentally delete the app at some point. You just never know! And that's why we're constantly on repeat and encouraging app customers to ...
BAAACK UPPP!
Here's what I do for my little back up workflow. The key is to do this with every single page ... UPON COMPLETION of the page. I don't wait. I just do it right then. The extra minute or two (at most) is completely worth it and I can sleep at night knowing that my pages are all backed up in a few places. So ... upon completion of the page, and while the page is still on my screen, I tap the little export symbol in the corner. These options pop up. See "Export"? Tap that.

You are then prompted to choose a size (I always choose 12x12, just in case the page ever needs to be printed that large ... you never know) and then you finalize WHERE you want to export / save the page. I export to two places. The order doesn't matter, but first I save to iCloud Photo Sharing and put it in my family yearbook shared folder (that is only shared with my husband, our kids, and my parents who I know love seeing our weekly pages). Then I go through the export steps again and save to Dropbox, where I name the file and add it to a sub folder, where I keep a year's worth of completed family yearbook pages.
This is a look at that iCloud folder open, and you can see a bunch of my pages just hanging out, all happy and content in that one back-up place. I mean ... my memories are MUCH happier being in a printed, tangible format (hello! ALWAYS!) ... but it just feels so good to have my pages saved in the app AND backed up in a couple other places too! Take precautions with your precious memories, my friend. And here's a blog post that you'll definitely want to read about THAT topic, if you missed it.

Oh! Guys!
One more thing I do during this "finish + export" phase of each page: So you know that little export icon in the corner? It also gives you the option to "Update Page Info" (Yes! That's where I NAME my pages, which is HUGELY important if you intend to order a photo book!) and I also "Add to Folder" and ensure that page makes it into the correct folder. For example, "2018 Family Yearbook" is the name of this year's folder. I also have other folders like "Recipes" and "Grateful 2017" and other projects I have going on. The reason that naming your pages is so significant is that when it's time to order a photo book and you go to pull your pages into the project one at a time, you will THANK YOURSELF that they're already in order because of the way you named your pages!
How I name my pages: "2018 Week 01," "2018 Week 02," etc.
By the way, it's totally worth mentioning that the music (that you can't hear, obviously) that was playing in my home office while Claire and I were taking these pictures for this blog post, was totally the soundtrack to The Greatest Showman -- because, hello. What fantastic music.
STEP THREE -- REPEAT, REPEAT, REPEAT | Repeat week after week after week after week -- 52 weeks of the year. You know what's so awesome about setting up a system and figuring out a rhythm that works for you and establishing that routine?? Once you've done that you don't even have to THINK about what you're gonna do and how you're gonna do it! Know what I mean? Every Sunday rolls around and it's completely innate for me. I sub-conscientiously expect it. If it's helpful for you to set a reminder in your calendar, that could be very helpful too!
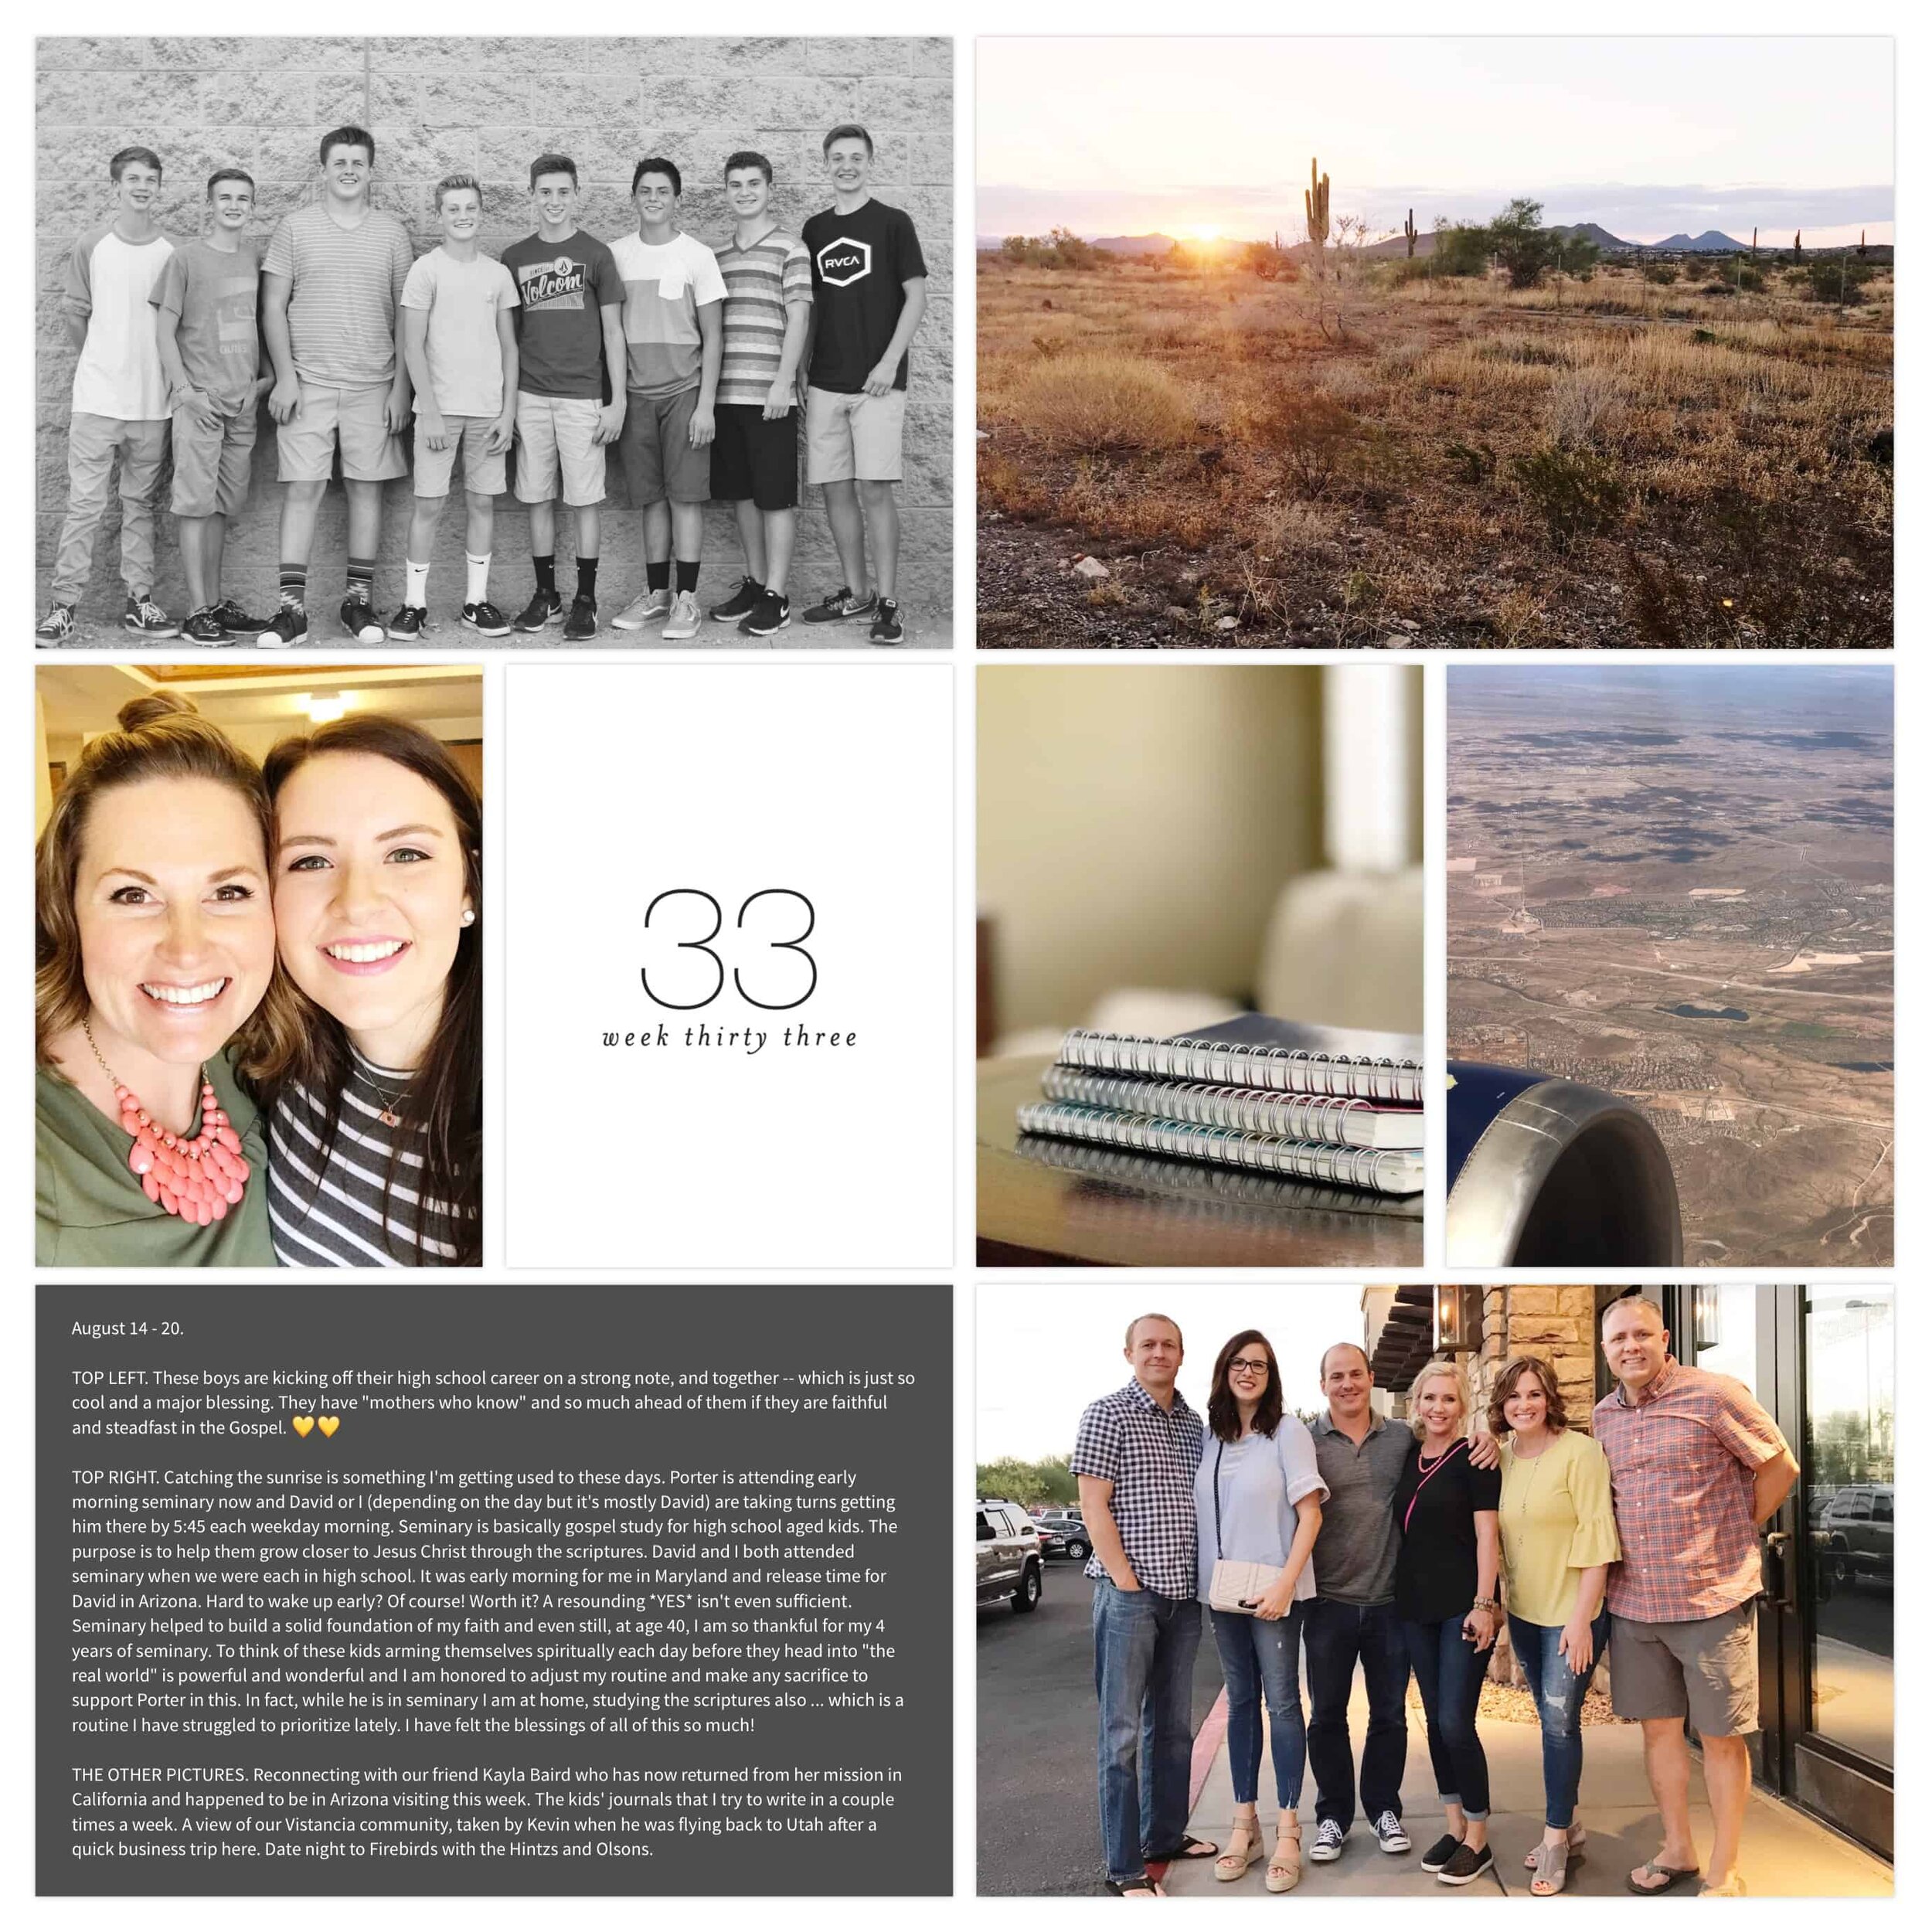
Seems like a good time to show you some actual pages from our 2017 family yearbook, eh? ; ) It's worth noting that I very rarely share my personal pages. After what feels like a million years in the scrapbooking industry and having shared so much of myself, I've learned to be careful about my sharing. I am mindful of what I share and what I don't share. I guard our family's privacy while also trying to balance that with direct inspiration from my personal memory keeping. It's a tricky balance, honestly. All that said, I'm going to share a bunch of pages from our family yearbook for the purpose of showing you examples of REAL pages with REAL stuff of life. You'll see the mixed bag of the types of things I choose to include. You'll see the simplicity and consistency of layout design I choose. And I suppose you'll have some insights about our life. There are a few things worth pointing out, which I hope will keep your wheels spinning about your own documentation.
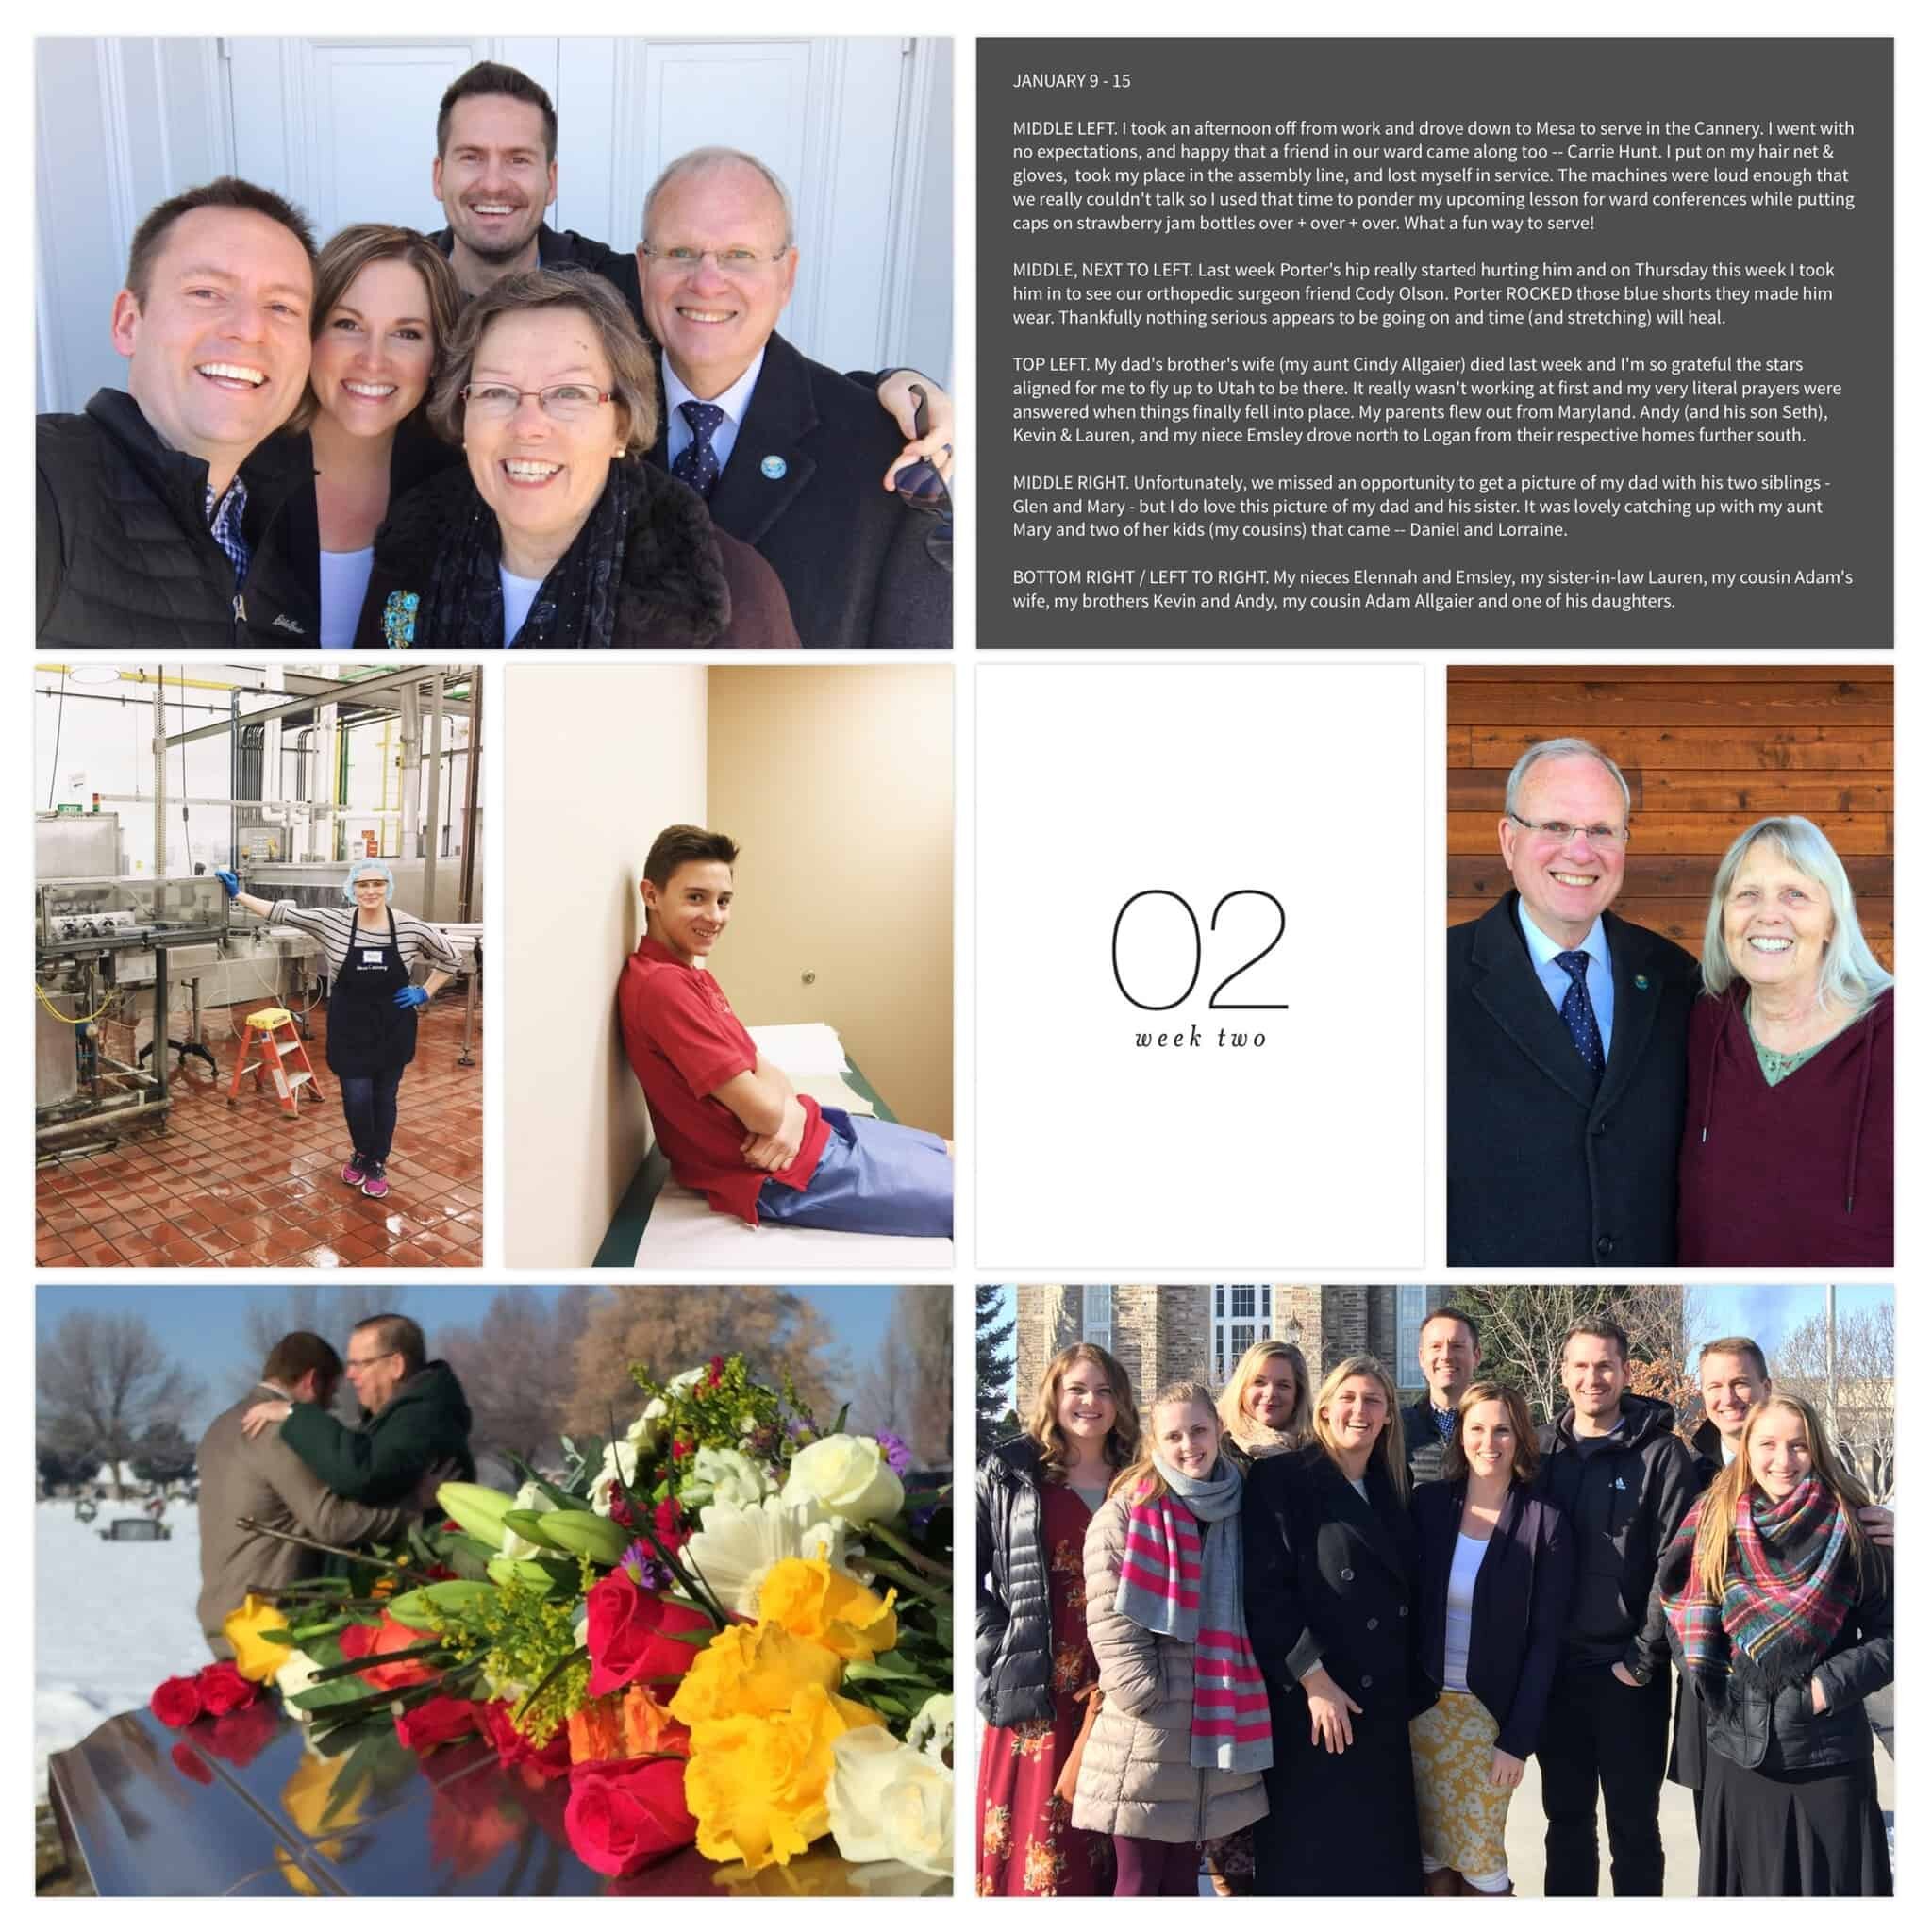
A "typical" week is usually quite varied in content, but sometimes there's a special occasion or trip in a given week that is significant enough that those are the pictures that dominate the page. Above, 4 of the 6 photos are from one day when I joined with my extended family for my aunt's funeral. I haven't seen some of that family in too many years and I'm so grateful to have these pictures.
Below, you can see that Week 5 is dominated completely by our annual trip to Tahoe. We have such a fantastic representation of "everyday" stuff throughout the yearbook, so an occasional page that is focused more on a big event or travel? Totally floats my boat.


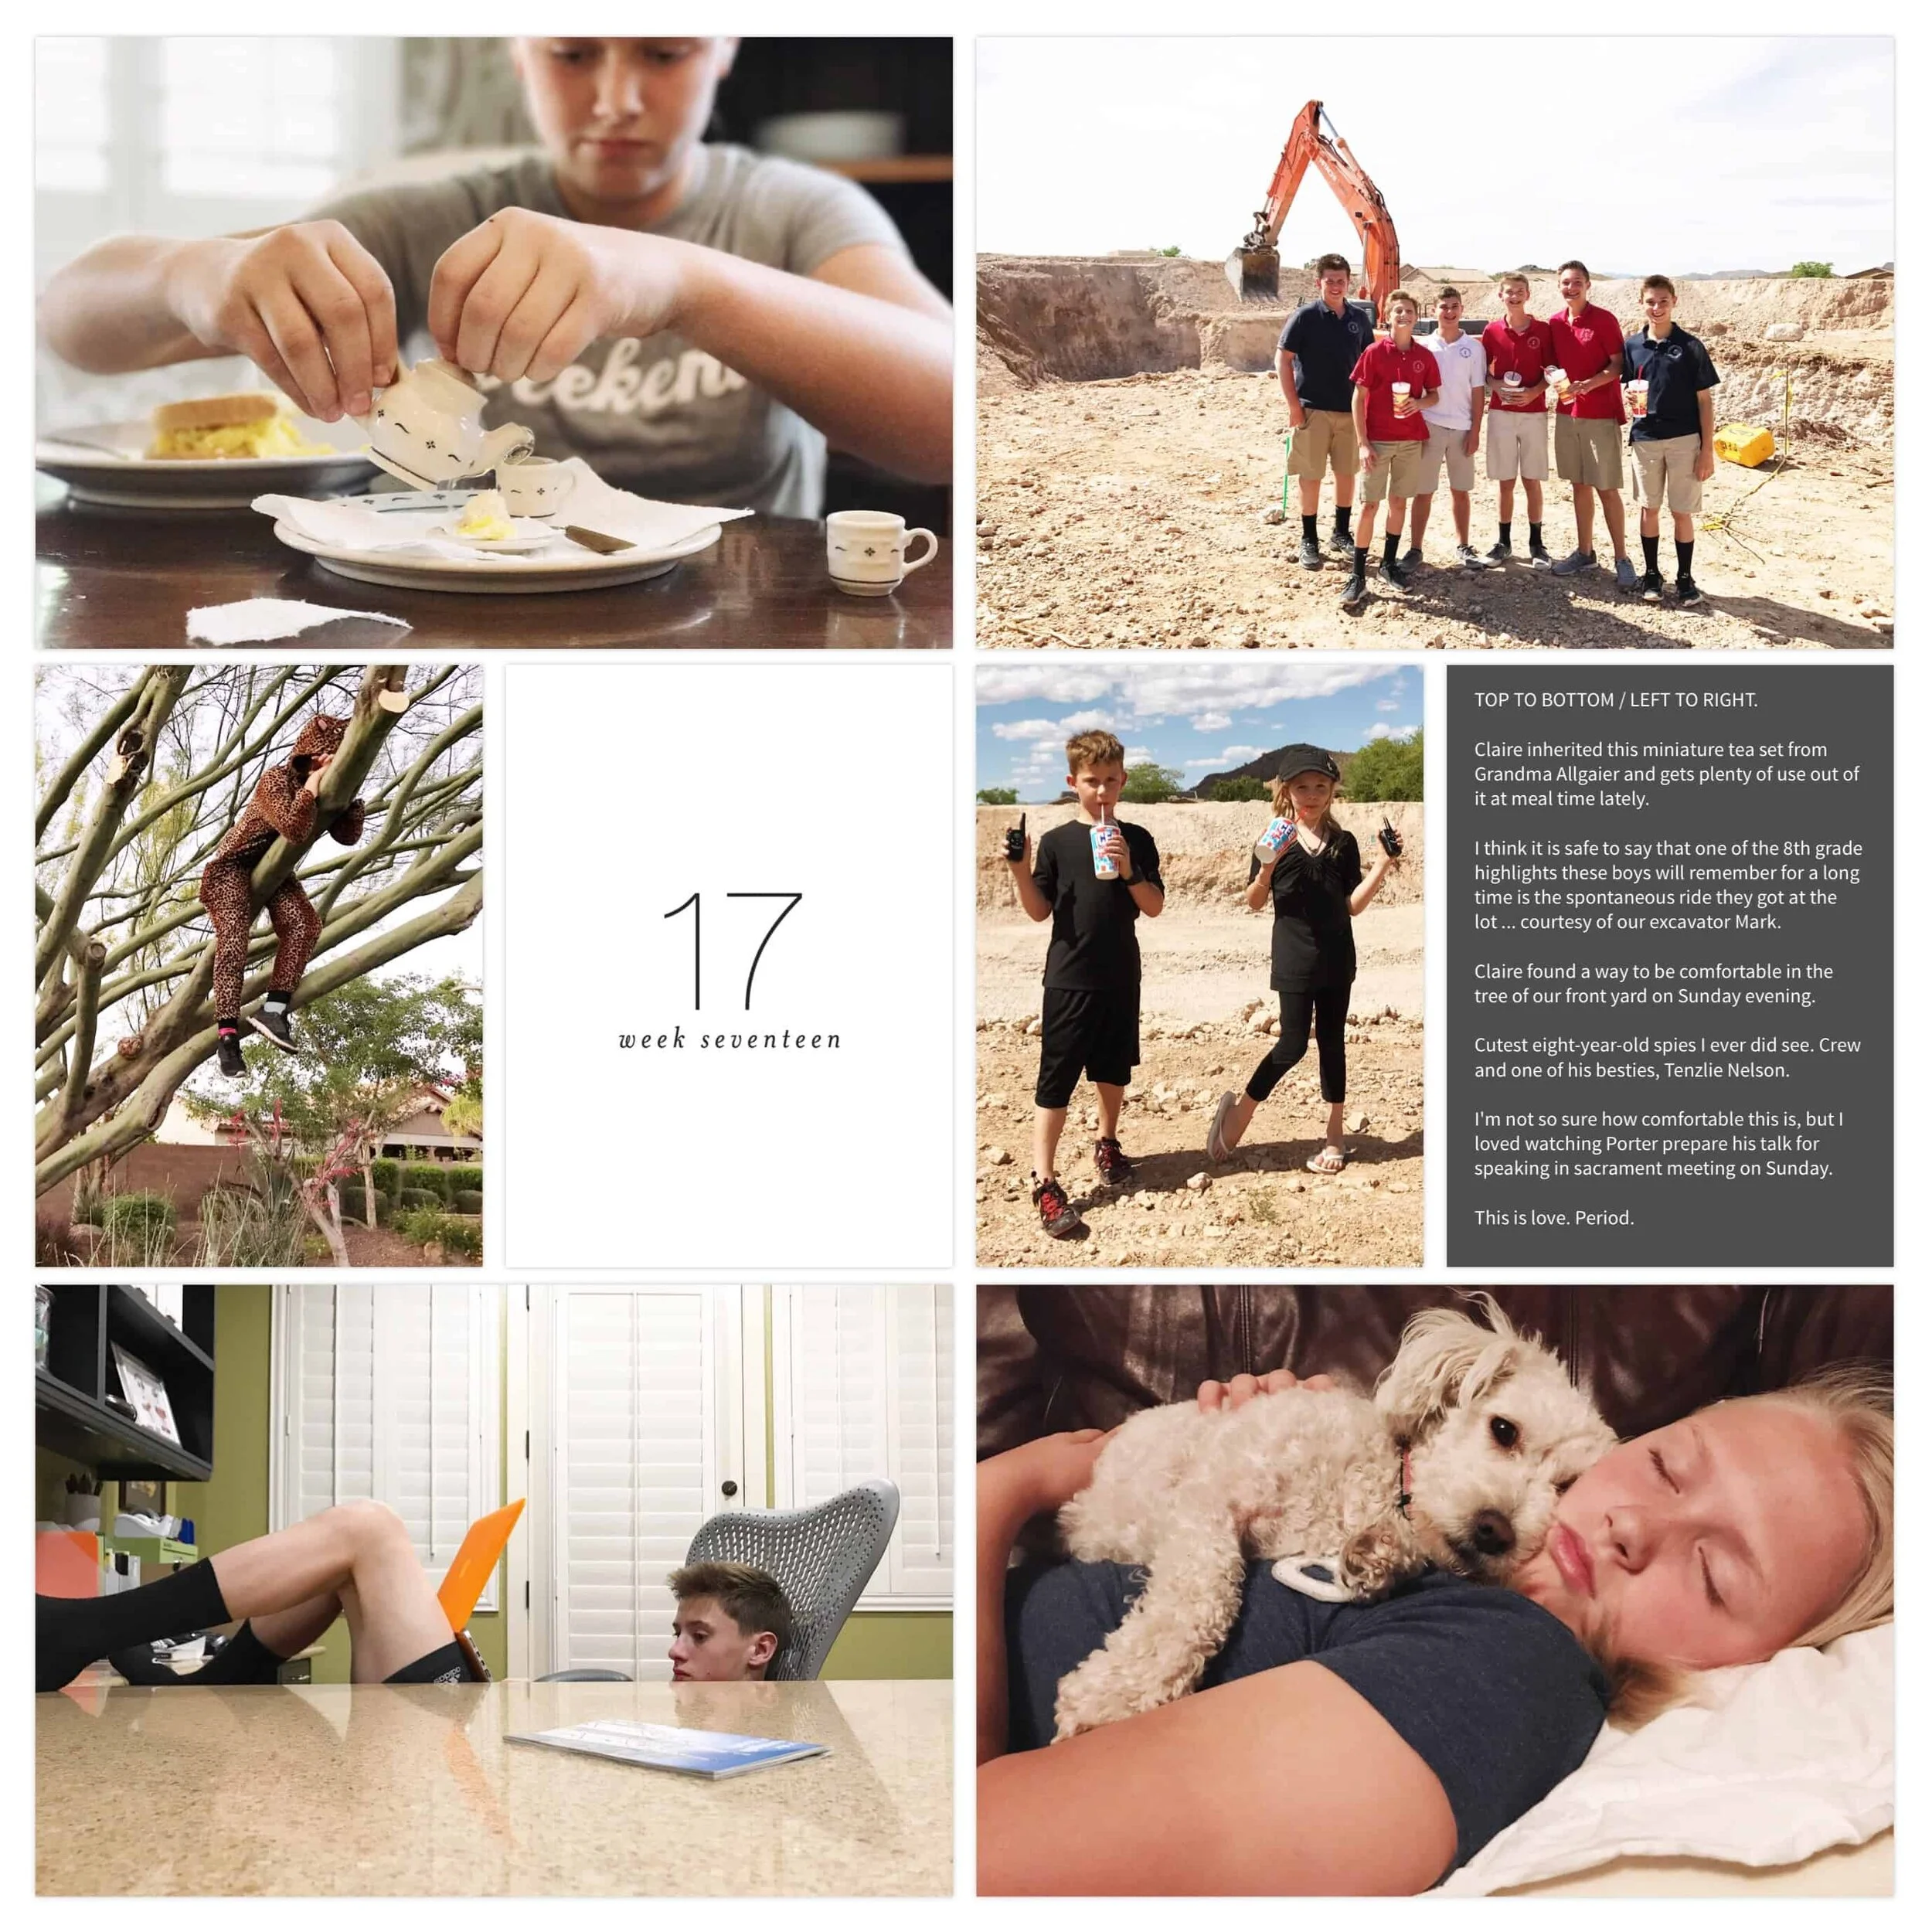


Okay, so notice the page above and the journaling block? It's in the 4x6 spot instead of my usual 3x4 spot because I had more to say and it was just too much for the little block.

Noteworthy in this page above: I'm definitely an advocate of documenting "the good, the bad, and the ugly." I want our family yearbooks to be a true depiction of our story. I don't want to hide the times that are discouraging or scary. So I'll include those things. But I also want to have a record of the fact that our faith always overrides our fear and that no matter what's happening around us, we still move onward and upward and there truly is ALWAYS so much to be grateful for. So you see ... these pages aren't just about "what we do" but also how we live, how we choose to see the world around us, how we pick ourselves up after falling down, people we choose to surround ourselves with, and how our faith affects everything.

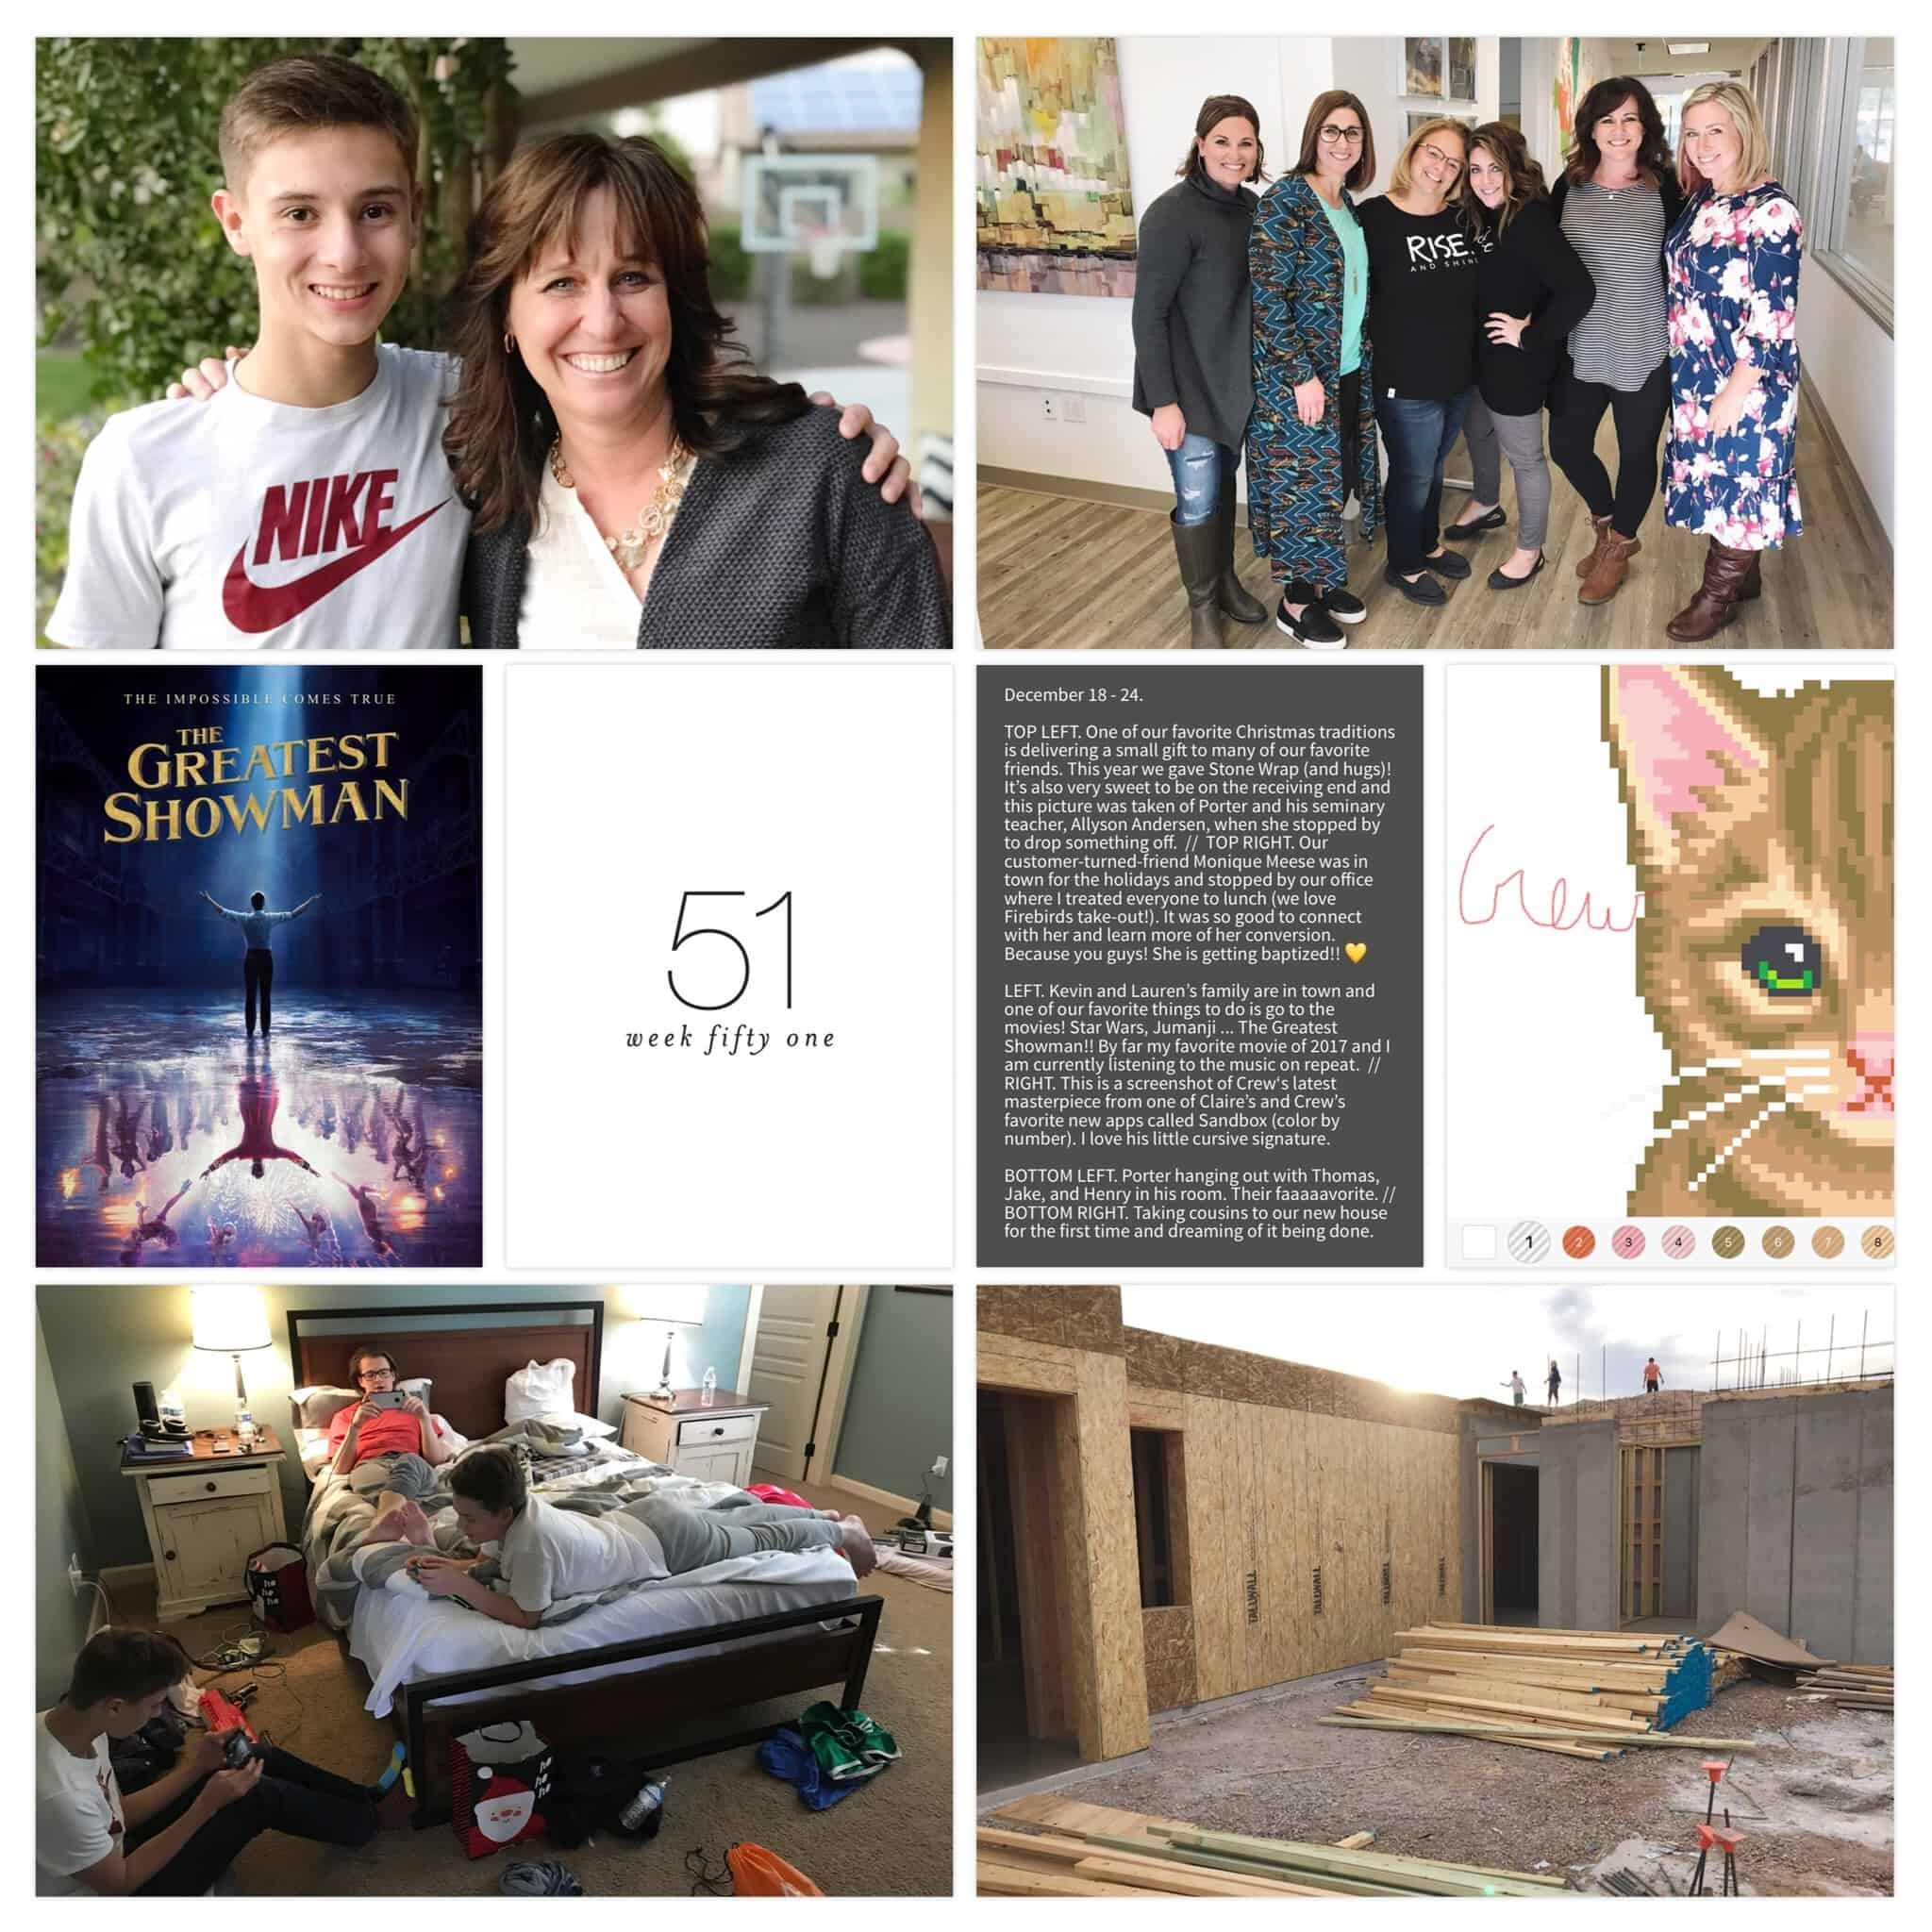
Notice (above) the couple of screen shots? Definitely a cool thing to include in your memory keeping and I find myself mixing these in sometimes, here and there. Below is an entire page of screen shots (and this is one of three pages that I have at the back of our family yearbook). It's a definite "time capsule" thing to do.

So you know that whole tagline I've got going?
Cultivate a good life and record it.
That's exactly what this is, guys! We are trying to cultivate -- truly cultivate -- a life that is good and happy and meaningful -- and by choosing to record the memories, I feel like I am personally that much more keenly aware of my blessings (which in turn makes me a happier, more grateful person), and I am also leaving tangible records that can be passed down through generations. Of course there's the whole "increased self-esteem" benefits for the kids, too! That's a very legitimate thing.I love memory keeping so. dang. much.
STEP FOUR -- ORDER THE BOOK
| At the end of the year, I order that year's family yearbook through the app. Period. I do not recommend exporting all your pages and trying to order through other sites, which is totally an option, but we can't stand behind that end product. We can't ensure that your borders will be even if we're not printing it ourselves. We can't promise that your edges won't be cut off. We can't stand behind the page quality or integrity of the binding or anything.We are so proud of the print and photo book quality that is produced by our print partner, White House Custom Colour (ask any professional photographer who uses their service) ... and coupled with the fact that ordering directly through the app is ridiculously convenient ... well, it's a no brainer. You can even use Apple Pay and not even go through the effort of pulling a credit card from your wallet - ha! ; )
(But seriously.)
Right there on the home screen of the app (and even in the corner of the Library page of the app) you'll see the button to "Order Prints & Photo Books." Nothing else to really explain because it's incredibly intuitive and user-friendly and so so so easy.

I order (1) hard cover copy to keep at home forever + (3) soft cover copies -- one for each child. They're all the 10" x 10" size. (We also have 8" and 12" options. All are great sizes and it's 100% a personal preference.) Pictured here is my recent order that I placed through the app -- all 4 photo books!
Anything you order through the Project Life App -- photo books and prints -- are very well packaged and protected so you can trust your tangible memories are going to arrive to you in tip-top shape. If ever there's an issue, that's something to report through the green "?" on the home screen of the app so we can take care of you.

I recently ordered a couple more soft cover photo books from our 2016 year (pictured here) because I hadn't done that yet! You'll notice that the cover is always a full-sized family photo from that year. Typically the one that is on our Christmas card.

photo book details
Let's touch on the differences between hard cover and soft cover real quick. First of all, I'm stating the obvious: The hard cover is more expensive than the soft cover. I'll come back to that in a moment. These two books pictured below have the SAME content. The same designed pages. The same number of pages. Everything is the same except that one is hard cover and one is soft cover. Notice the thickness difference? The hard cover itself is thicker. The page thickness is slightly thicker. The flat-lay binding makes it a bit thicker. So the whole thing is ... yeah. It's thicker. Go figure. ; )

That mention of flat-lay binding? It's LEGIT, guys! As seen here (below), the hard cover is laying open completely flat on my lap. Effortless and yummy and the most supreme quality you'll ever see in a photo book. I'm talking it up like it's "better" than the soft cover ... but the truth is, one isn't better than the other. They're both fantastic. There's a significant price difference. You get what you pay for. And that's why it's so important to us, to offer you OPTIONS. The soft cover, while it doesn't lay flat, is absolutely gorgeous and we are so pleased with the quality on that product as well.

Another difference is the actual, finished book size. I'm holding these two books together, totally matched up in the bottom right corners, so you can see the difference in height and width. They're both "10x10," but that's an estimated size.

Another different is maximum page count. For the hard cover, the maximum number of pages is 30 (60 sides), whereas the maximum for a soft cover photo book is 100 pages (200 sides). The reason we're more limited on the hard cover page count is 100% due to ensuring that we don't mess with the integrity of the binding. Trust me -- you don't want your book falling apart. Ever.
One more note worth pointing out: The page quality in both hard cover and soft cover photo books is wonderful. You'll see what I mean when you receive your own photo book (since you can't reach through the screen and feel my photo book right now -- wouldn't that be nice??). The pages of the hard cover are particularly spectacular and I DARE you to resist feeling / caressing (!) the pages over + over when you get your book. ; )

Let's talk cost!
When someone asks, "How much do your photo books cost?" -- we literally cannot answer that because of the options and variables. The best way to answer the question is to point you to a couple blog posts that really lay it all out. The title of each blog post is linked for your convenience.
Photo Books vs. Prints: This blog post explains the differences, the pros and cons of each, and goes into cost details and comparisons. NOTE: That blog post was written before we had the soft cover photo book option. But it's still helpful!
Soft Cover Photo Books: This blog post covers the details of our soft cover option, including cost + page count options.
Remember you always have the option to print pages along the way instead of all at once + in a photo book, where there tends to be more "sticker shock" (even if it doesn't necessarily cost more, paying all at once can feel a bit more expensive). This is what I used to do (before photo books were an option) and this blog post is a fantastic and detailed overview of that work flow, complete with pictures of the end result (pages in an album instead of a photo book).
What I can be straightforward about is what I paid for my recenter order of our 2017 family yearbooks, since that's what I've been sharing throughout this post, and it's the very same format I'm doing in 2018 ... which means it'll cost the same when I order my 4 books this time NEXT year! Both have 30 physical pages (which means 60 sides, or 60 completed app pages).
Hard Cover = $229.84(I purchased one copy for us to keep at home; price is the grand total after taxes + shipping)
Soft Cover = $65.27/each(I purchased 3; one for each child to keep; price includes grand total after taxes + shipping)
To order four copies at the end of each year is my personal method and choice (so each child has a set of family yearbooks, as I discussed earlier), but that may not be the best fit for you. Remember the purpose of this blog post is to share what I'm doing ... what works for me ... and what you take from it, and what you feel you want to do or not do is entirely up to you! Of course! ; )
tips
A couple things that come to mind: Be sure you have the latest app update, always! We put out an update about once a month. Be sure you bump up your brightness a bit on your photos because that back-lit screen on your device is different than your printed pages and I find the best results when I bump up my brightness a bit. We have photo-editing built right in the app, on each picture, for your convenience.
Honestly, there are so many helpful tips & tricks to share and I could really blow this blog post up. But the thing is ... that content is "already out there!" And let's be honest -- this blog post is long enough as it is! I will happily point you to a few resources that you don't HAVE to check out, but I think you'd really benefit from learning a bit more, just to make your app scrapbooking experience a little sweeter. ; )
1) YouTube. We have a whole playlist called "Project Life App" with awesome video tutorials that walk you through specific points and tips and how-to's.
2) Social media. We are regularly sharing app tips (#ProjectLifeAppTips) on Instagram and Facebook, so be sure to follow us there!
3) Blog post. There's a whole blog post called "Tips for Creating Your Project Life Photo Book." Check that out -- seriously.
4) More blog post goodness. There's one more blog post worth linking here. I wrote it a couple years ago but STILL apply all the principles + tips I shared then ... only with minor adjustments now, since I'm a fan of evolution. For example, I'm currently using the iPhone 7 Plus for 100% of my pictures and I choose to make just one page per week instead of two pages and I'm now printing photo books instead of pages that slip into page protectors + albums. I mean ... if it works, then keep doing it, right?? That blog post is nicknamed the "Scrapbooking Success" blog post and it's packed with excellent content, including how I take pictures, what I take pictures of, why I delete pictures every day (hint: I am way less overwhelmed because I do this!), how I choose which photos to use, journaling tips, and so much more!
alternatives to weekly documenting
Feeling overwhelmed? If the idea of doing a page every week of the year feels a bit daunting or unrealistic, but you still want to do something along those lines of chronological memory keeping ... try monthly instead. One layout per month and you do it at the end of each month. Bam! Easy!
Feeling ambitious? I mean, hey! If you want to take this concept to the next level, try a daily approach -- Project 365! I personally did this a few years in a row and it's pretty neat and really helps you focus more on everyday treasures, more than just the "big stuff" that happens in life. I love it, but it is ambitious because you really do need to remember to take at least one picture every single day in order to keep up that pace.
Feeling like any kind of "structured plan" isn't your style? Try sporadic scrapbooking whenever the heck you feel like it! You could focus entirely on events or gratitude or whatever you want! You could throw chronology out the window! For the love of all things memory keeping and being happy in your endeavors ...
Do what works for you!
At the end of the day
What really matters to you when it comes to memory keeping?
For me, I want any memory keeping that I do to be a POSITIVE and joy-filled experience! I want it to be quick + easy so I'll actually get it DONE. I want to do SOMEthing ... instead of nothing. So what I'm doing works for me and my invitation is for you to take a quiet moment to ponder all of this for yourself and determine ... what will work for YOU in 2018?
You guys -- I LOVE MAKING PHOTO BOOKS THROUGH THE APP! I know. I'm shouting. But for real, I love. this. so much!!

PS -- Totally new here? (HELLO, and welcome! So glad you're here!) Not familiar with how the app works? Want to see it in action before you spend the couple bucks? You can catch that demonstration video
.